Training plans management
Only users with completed coach profile can view, create and edit training plans
In this article:
- View training plans
- Create a training plan:
- Plan activities, events, competitions within the plan
- Assign plan to athletes
- Remove assignment
- Publish plan in the Store
- Publish plan updates in the Store
- Unpublish plan
View training plans
In order to manage training plans you need to go to the section “Methodology” - “Training plans”
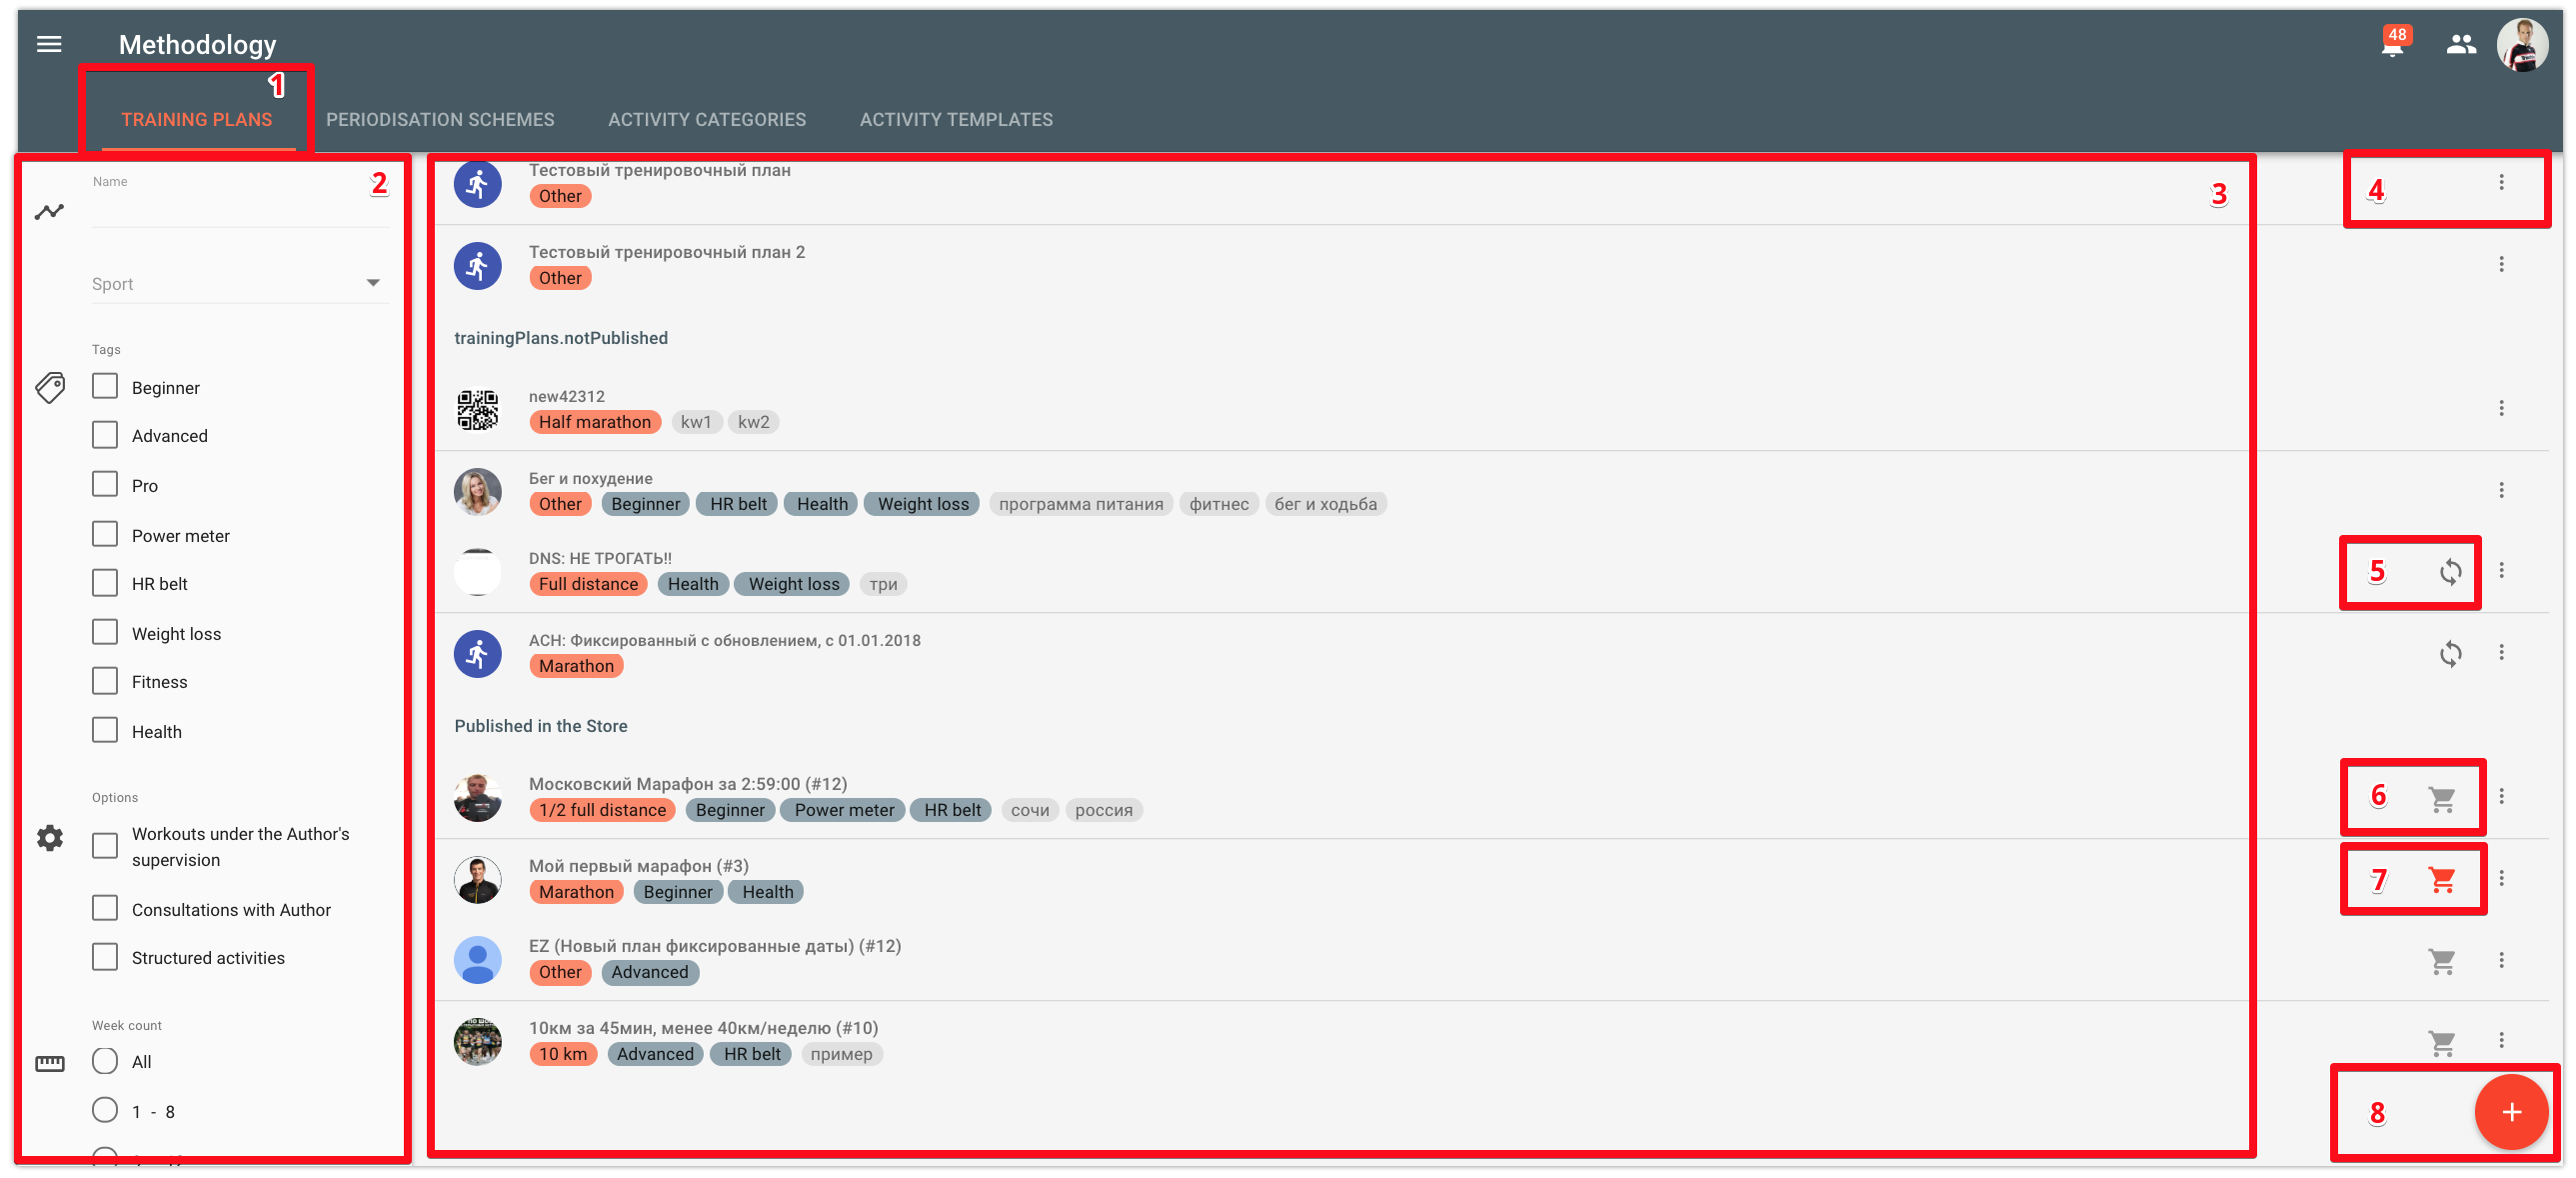
In this window you can view previously created plans, filter plans, create new and manage existing ones.
Structure of the window:
- 1 - "Training plans" tab in Methodology. Using the other tabs you can manage periodization schemes, categories and activity templates. Information about how to work with these sections you can find in relevant articles;
- 2 - plans filter. Enables to select only the needed training plans;
- 3 - training plans list. Plans are grouped by publication in the Store;
- 4 - plan’s context menu providing access to functions: "Create plan items", "Assignments", "Training plan publication", "Preview in Store" and "Unpublish plan";

5 - dynamic plan attribute. Detailed information about plan types you can find in this article;
6 - attribute of training plan publication in the Store without any changes to update the plan;
7 - attribute of changes available in the published plan. It is displayed when the current version of the plan differs from the one published in the Store;
8 - button to create a plan.
Create a training plan
In order to create a training plan, you need to go to the section “Methodology” - “Training plans” and click on the “Add” button [8].
There are several tabs in the new plan creation window
- tab "General" is available always,
- tabs "Store", "Description" and "Samples" are available only for plans meant for publication.
Tab "General"
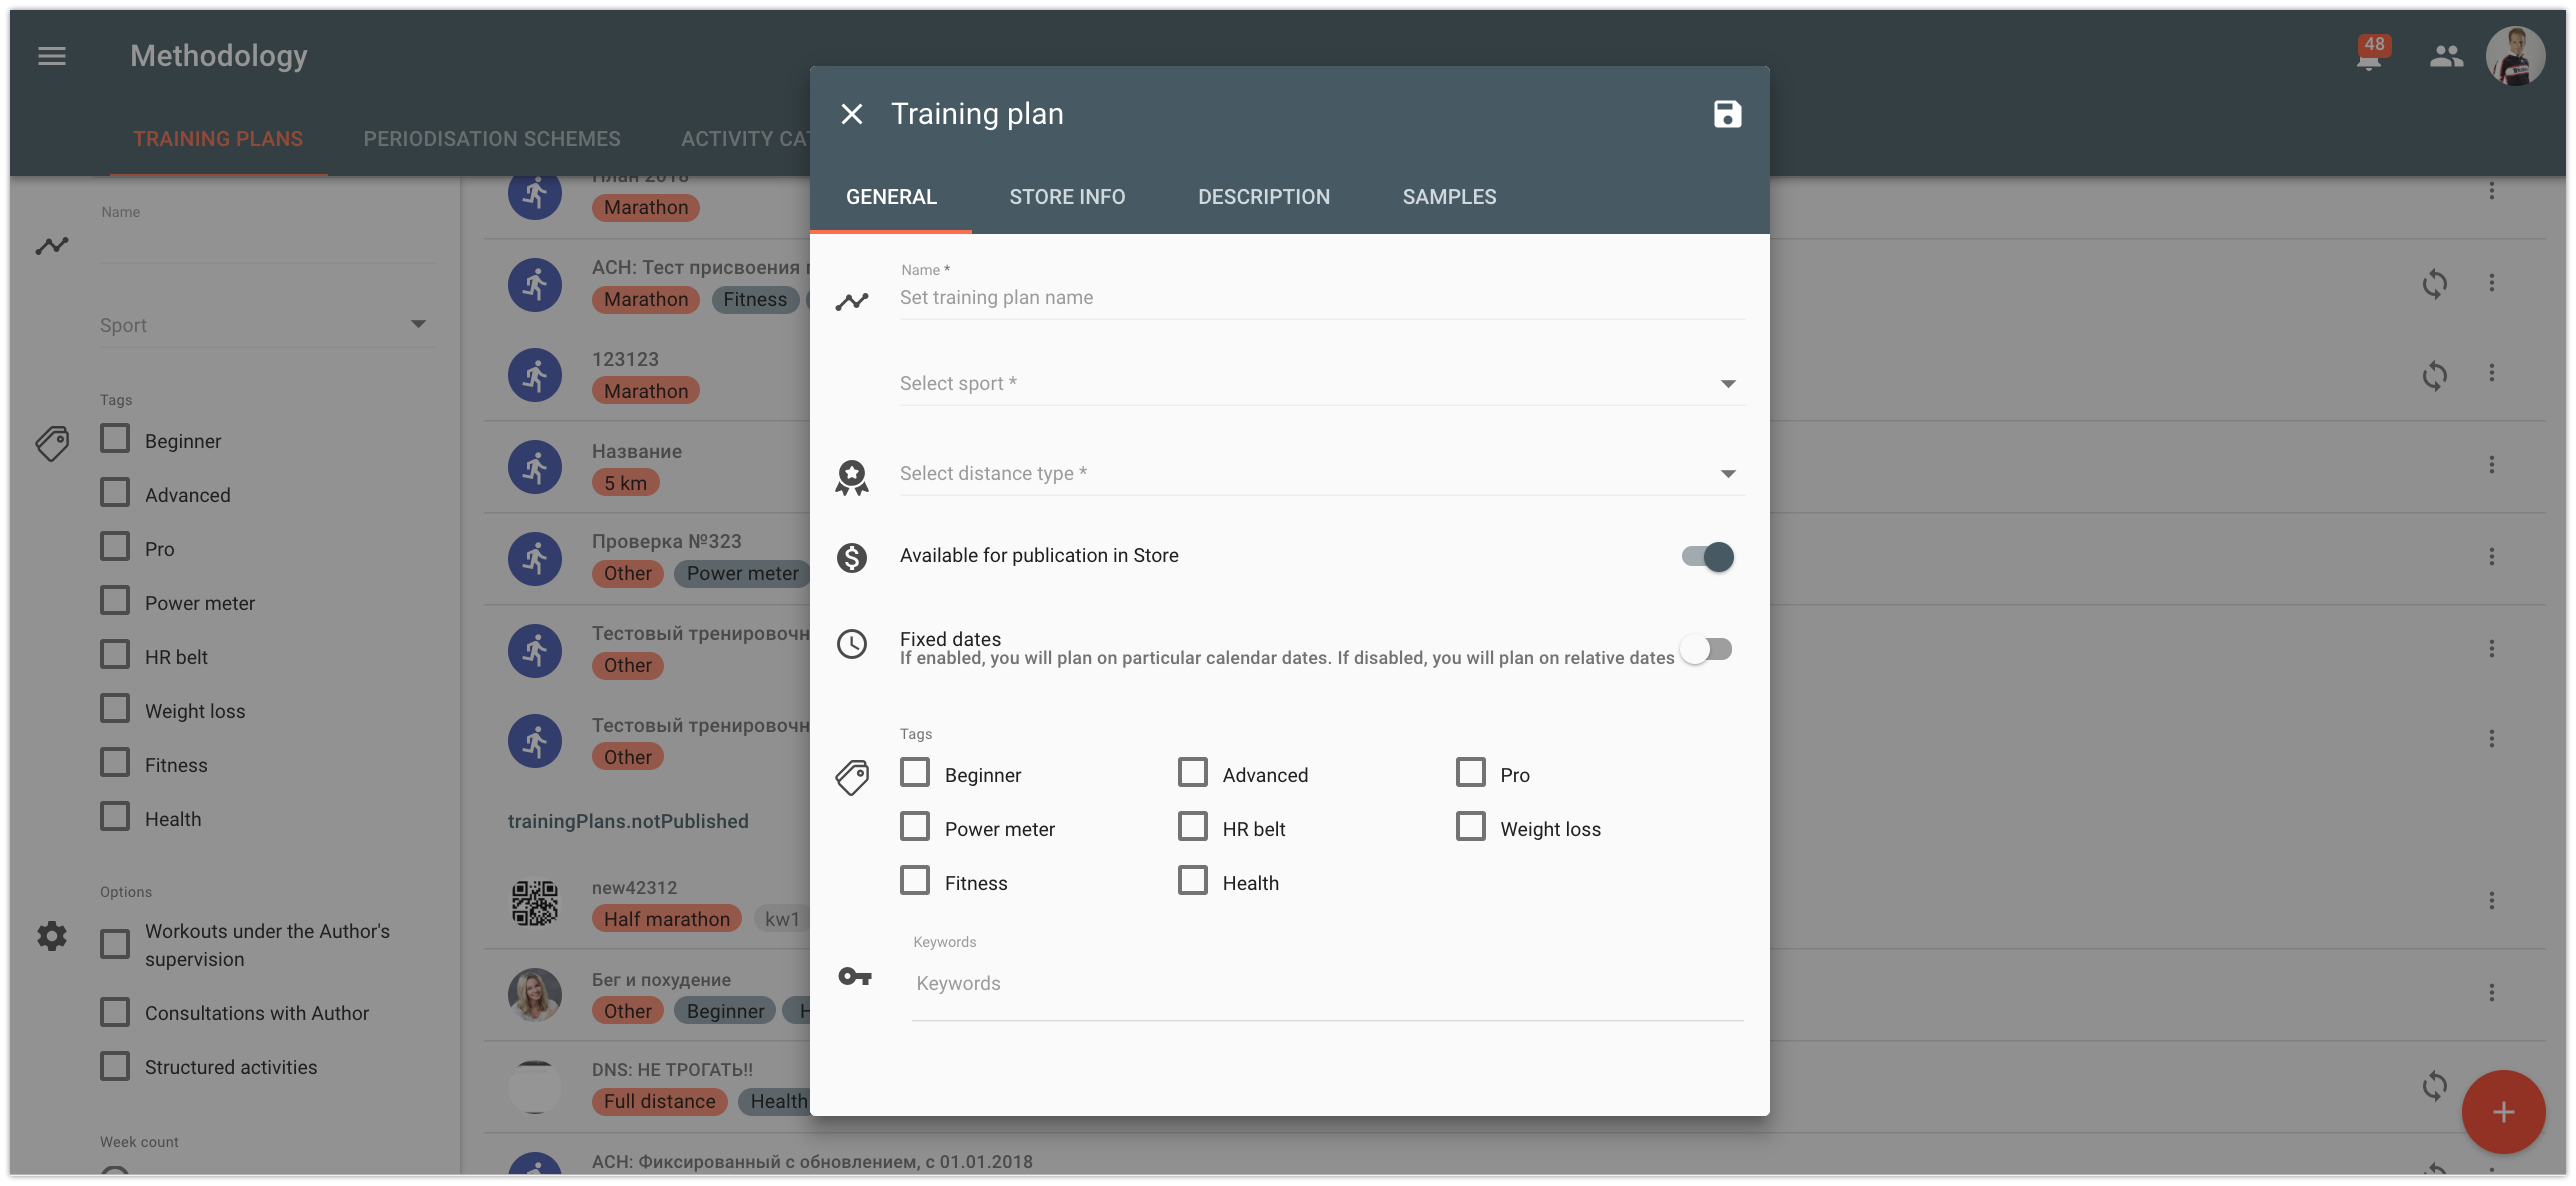
On this tab you can set:
- Plan name
- Sport for which the training plan is designed;
- Distance type for which the athlete is being prepared;
- Plan for publication. Enable this attribute for plans you want to publish in the Store;
- Fixed dates. Enable this attribute to create a plan with fixed dates and disable for plans with non-fixed dates. If the attribute isn't set, then the plan will be created for unspecified dates (Week 1, Day 1; Week 1, Day 2 and etc.) Such universal plan can be used in any dates.
- Start date. You need to set the start date for plans with fixed dates.
- Dynamic plan (only for plans with fixed dates). Enable this attribute if you want to create a dynamic plan and transfer plan changes to assigned athletes.
- Tags. Select attributes suitable for your plan. They will help you to filter plans and as for plans put up for sale, they will help customers to select the required plan.
- Keywords. In addition to tags, you can set keywords. They are also meant to help customers in their plan selection.
Tab "Store"
is available only for plans with enabled "For publish in Store" attribute

On this tab you can set:
Attribute "Paid plan". Enable for plans that are put up for sale. If the attribute is enabled, set currency and price. As for now, only "Rubles" currency is available and the price should be within 300 - 10 000 RUB.
Plan language is a language used by the author to describe activities within the plan. By default it's Russian.
Target audience (obligatory field) - describe for whom this plan has been designed.
Typical week (obligatory field) - describe training load for typical training week within the plan. Staminity will calculate and display on the plan page the average, maximum and minimum values based on the number of activities, duration and distance of activities within the plan, but your description will make the information complete.
Chart of training volumes within the plan - Staminity will automatically calculate the training volumes chart and display it on the plan page. This chart can be calculated based on duration or distance. You can select the required value depending on your planning approach. By default “By duration” value is set.
Attribute “Consultations included”. If the plan’s cost includes possibility of consulting with you, then you need to enable this attribute and describe how often the acquirer can contact you and how exactly.
Attribute "Offline activities included". If the plan's cost includes offline activities with you, then you need to enable this attribute and describe the frequency, time and place of these activities.
Attribute "Structured activities included". In case if you use structured activities within the plan, then you may enable this attribute and describe which activities you have divided into segments and which intensity indicator you have used. It is important information for athletes to check their LT value based on this intensity indicator in order to calculate the training load in a correct way.
Tab "Description"
Is available only for plans with “For publish in Store” attribute enabled
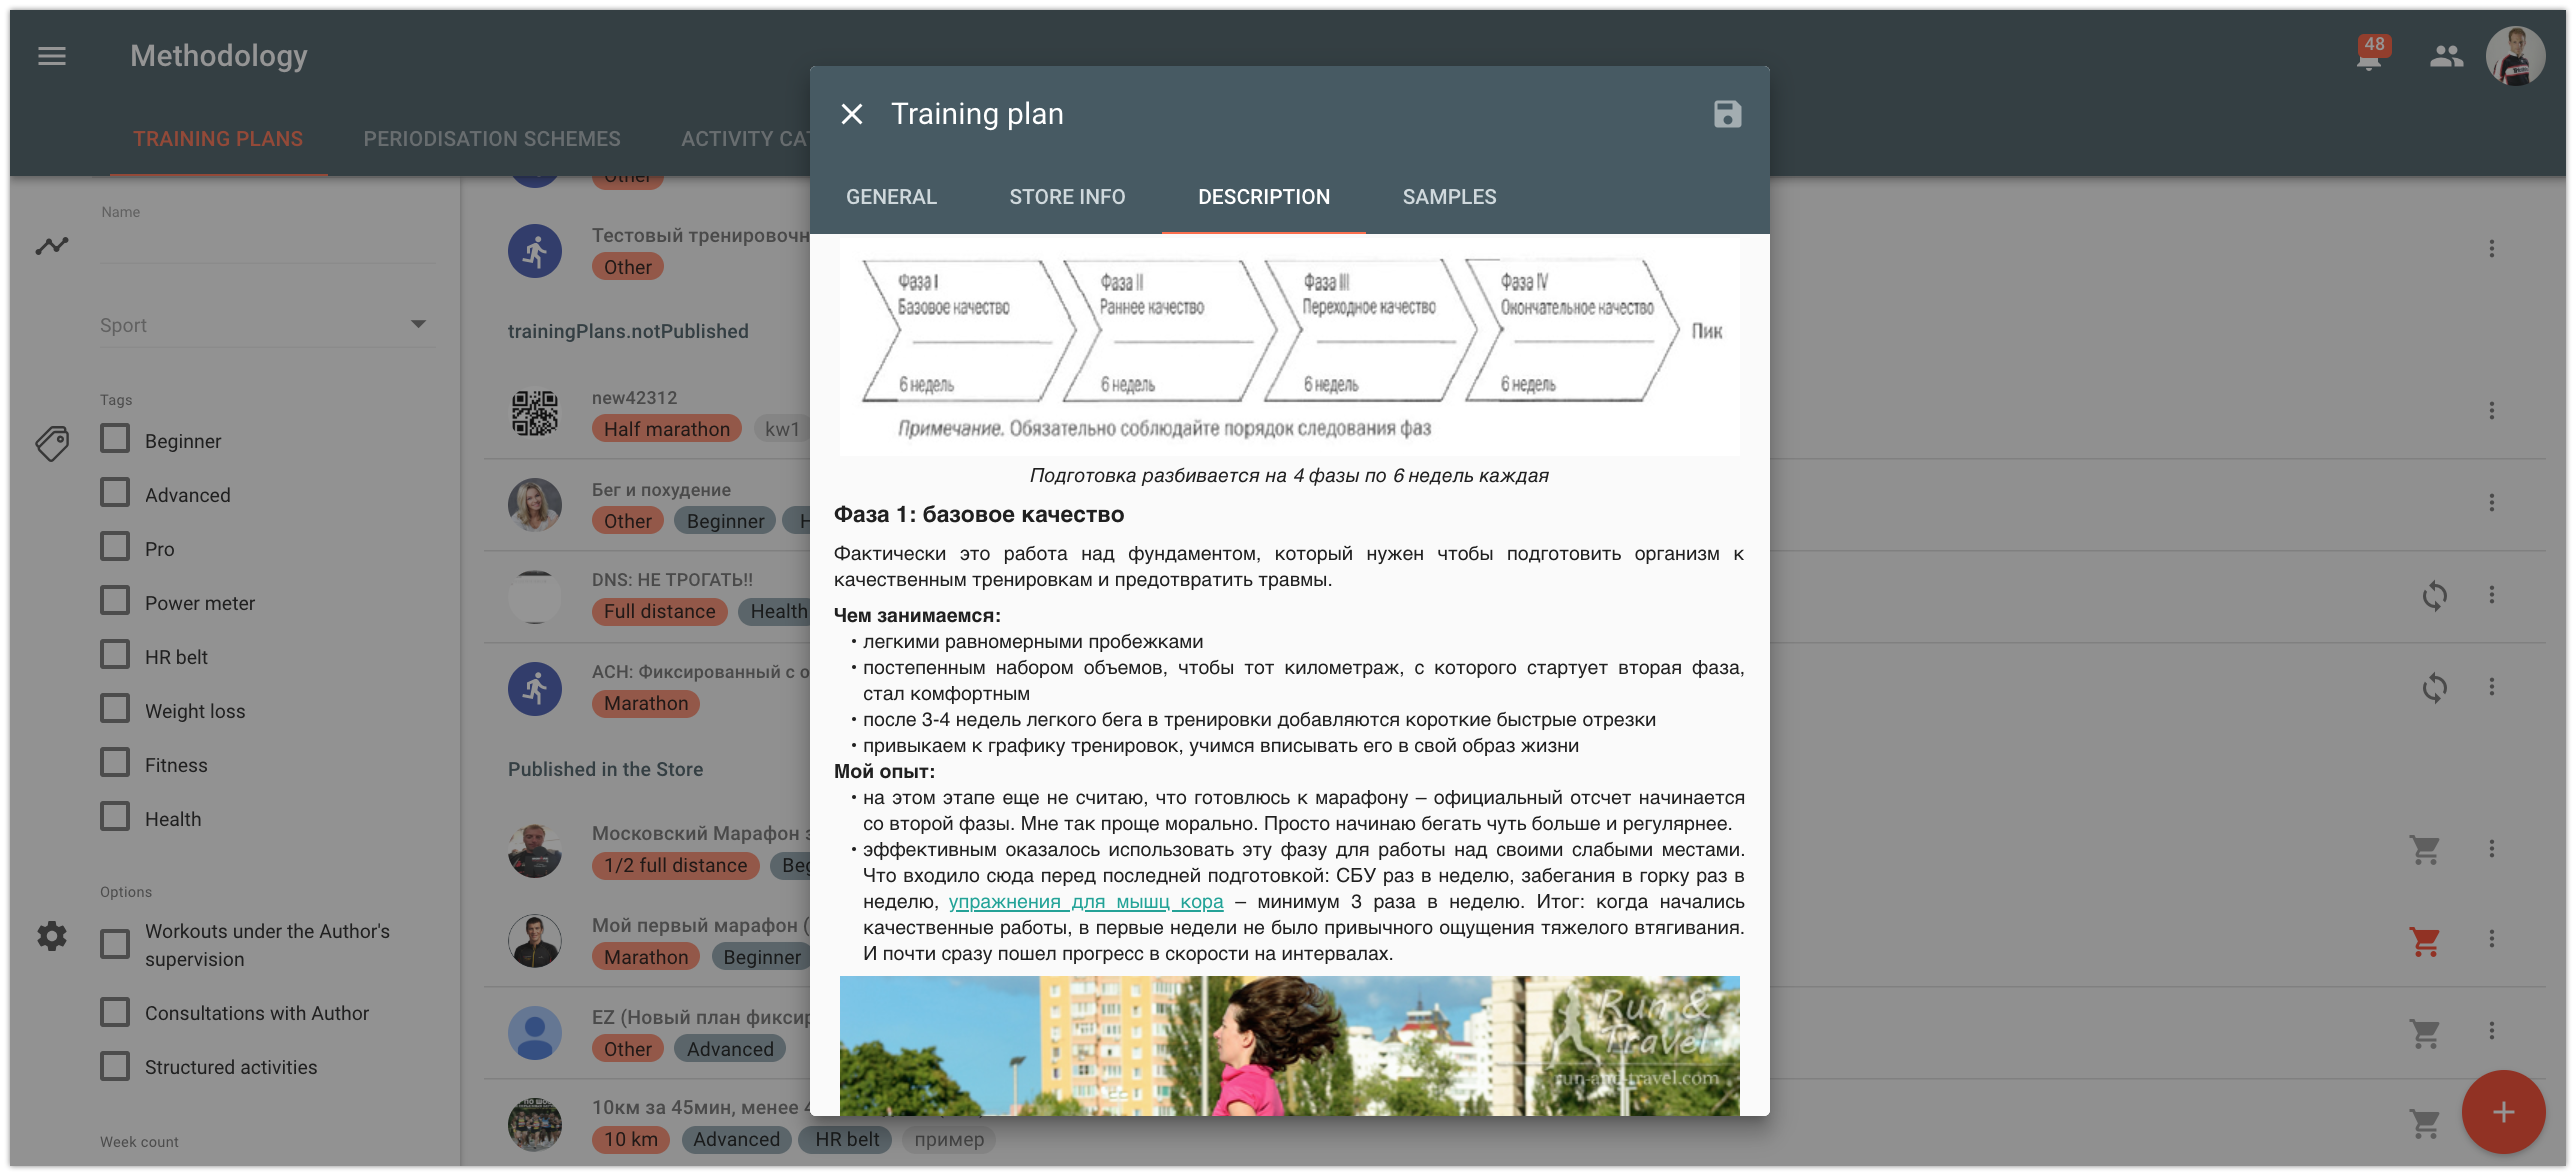
Describe the plan as you want to. For plans intended for publication, description is displayed on the plan page in the Store and greatly affects the plan selection.
Make it impressive and memorable, use text formatting, insert images and links to videos.
Tab “Samples”
Is available only for plans with “For publish in Store” attribute enabled.
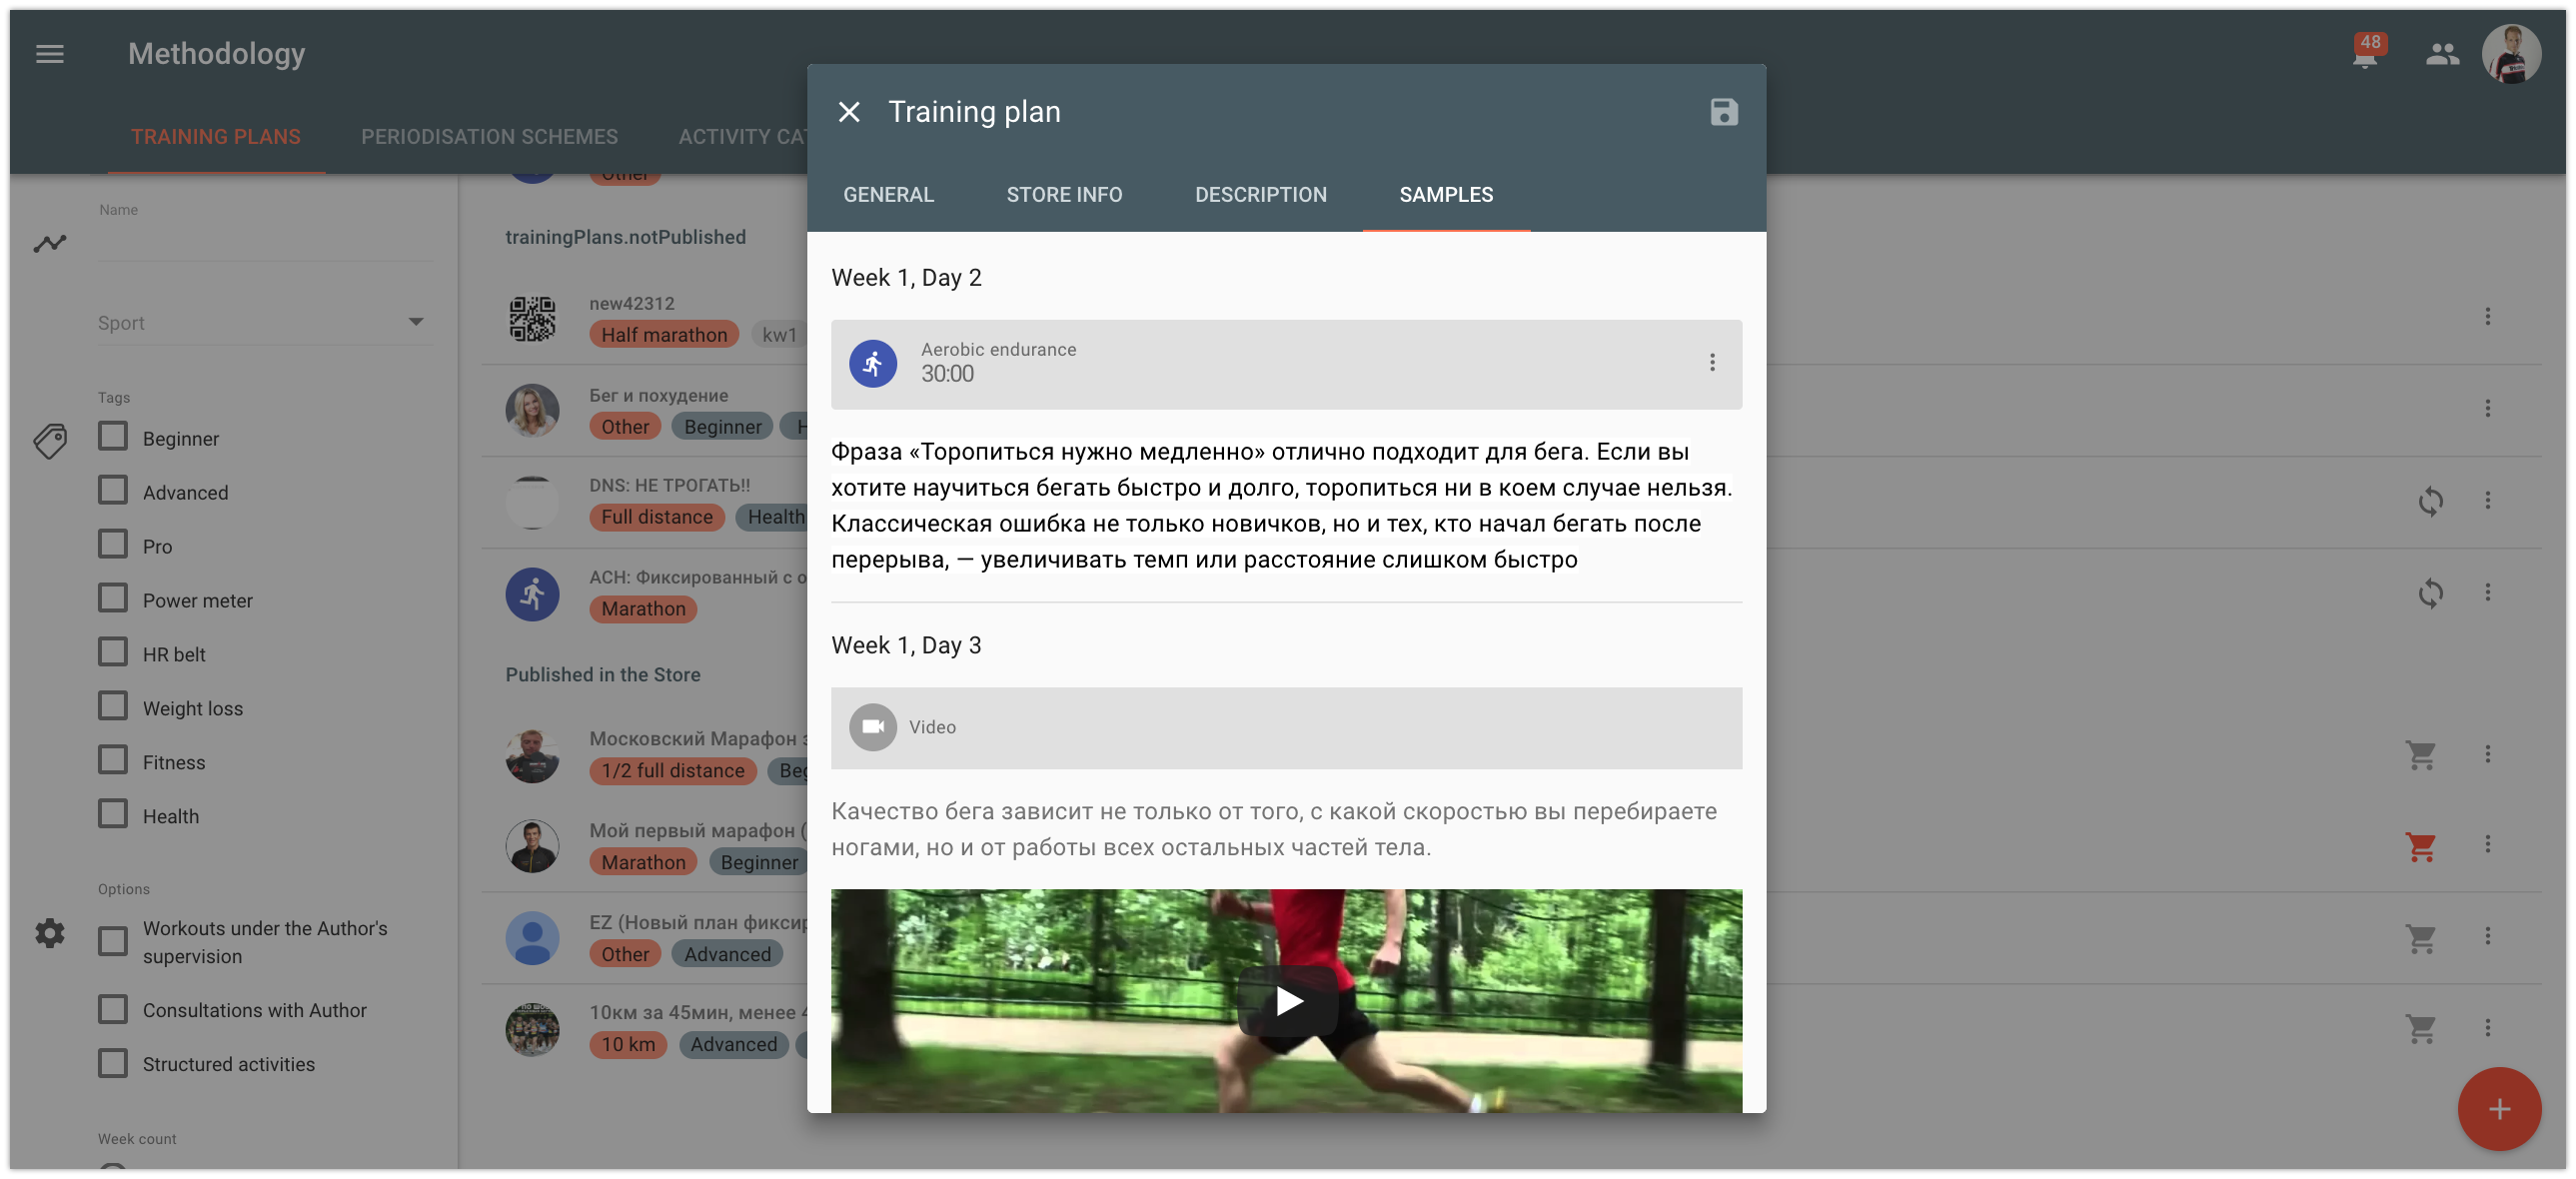
On this tab, you will find activity samples. In order to set an activity or event from the plan as a sample, go to the plan constructor and enable the “Set as sample” attribute.
Activity samples provided in the plan will help potential clients to study your planning approach and accuracy of description.
Plan images
Images can be set only for a saved plan.
In order to download images you need to go to the “Store” tab and select:
- "Edit" to download new plan image (this button becomes available when you hover over the image);
- "Edit background" to download the main image of the plan.
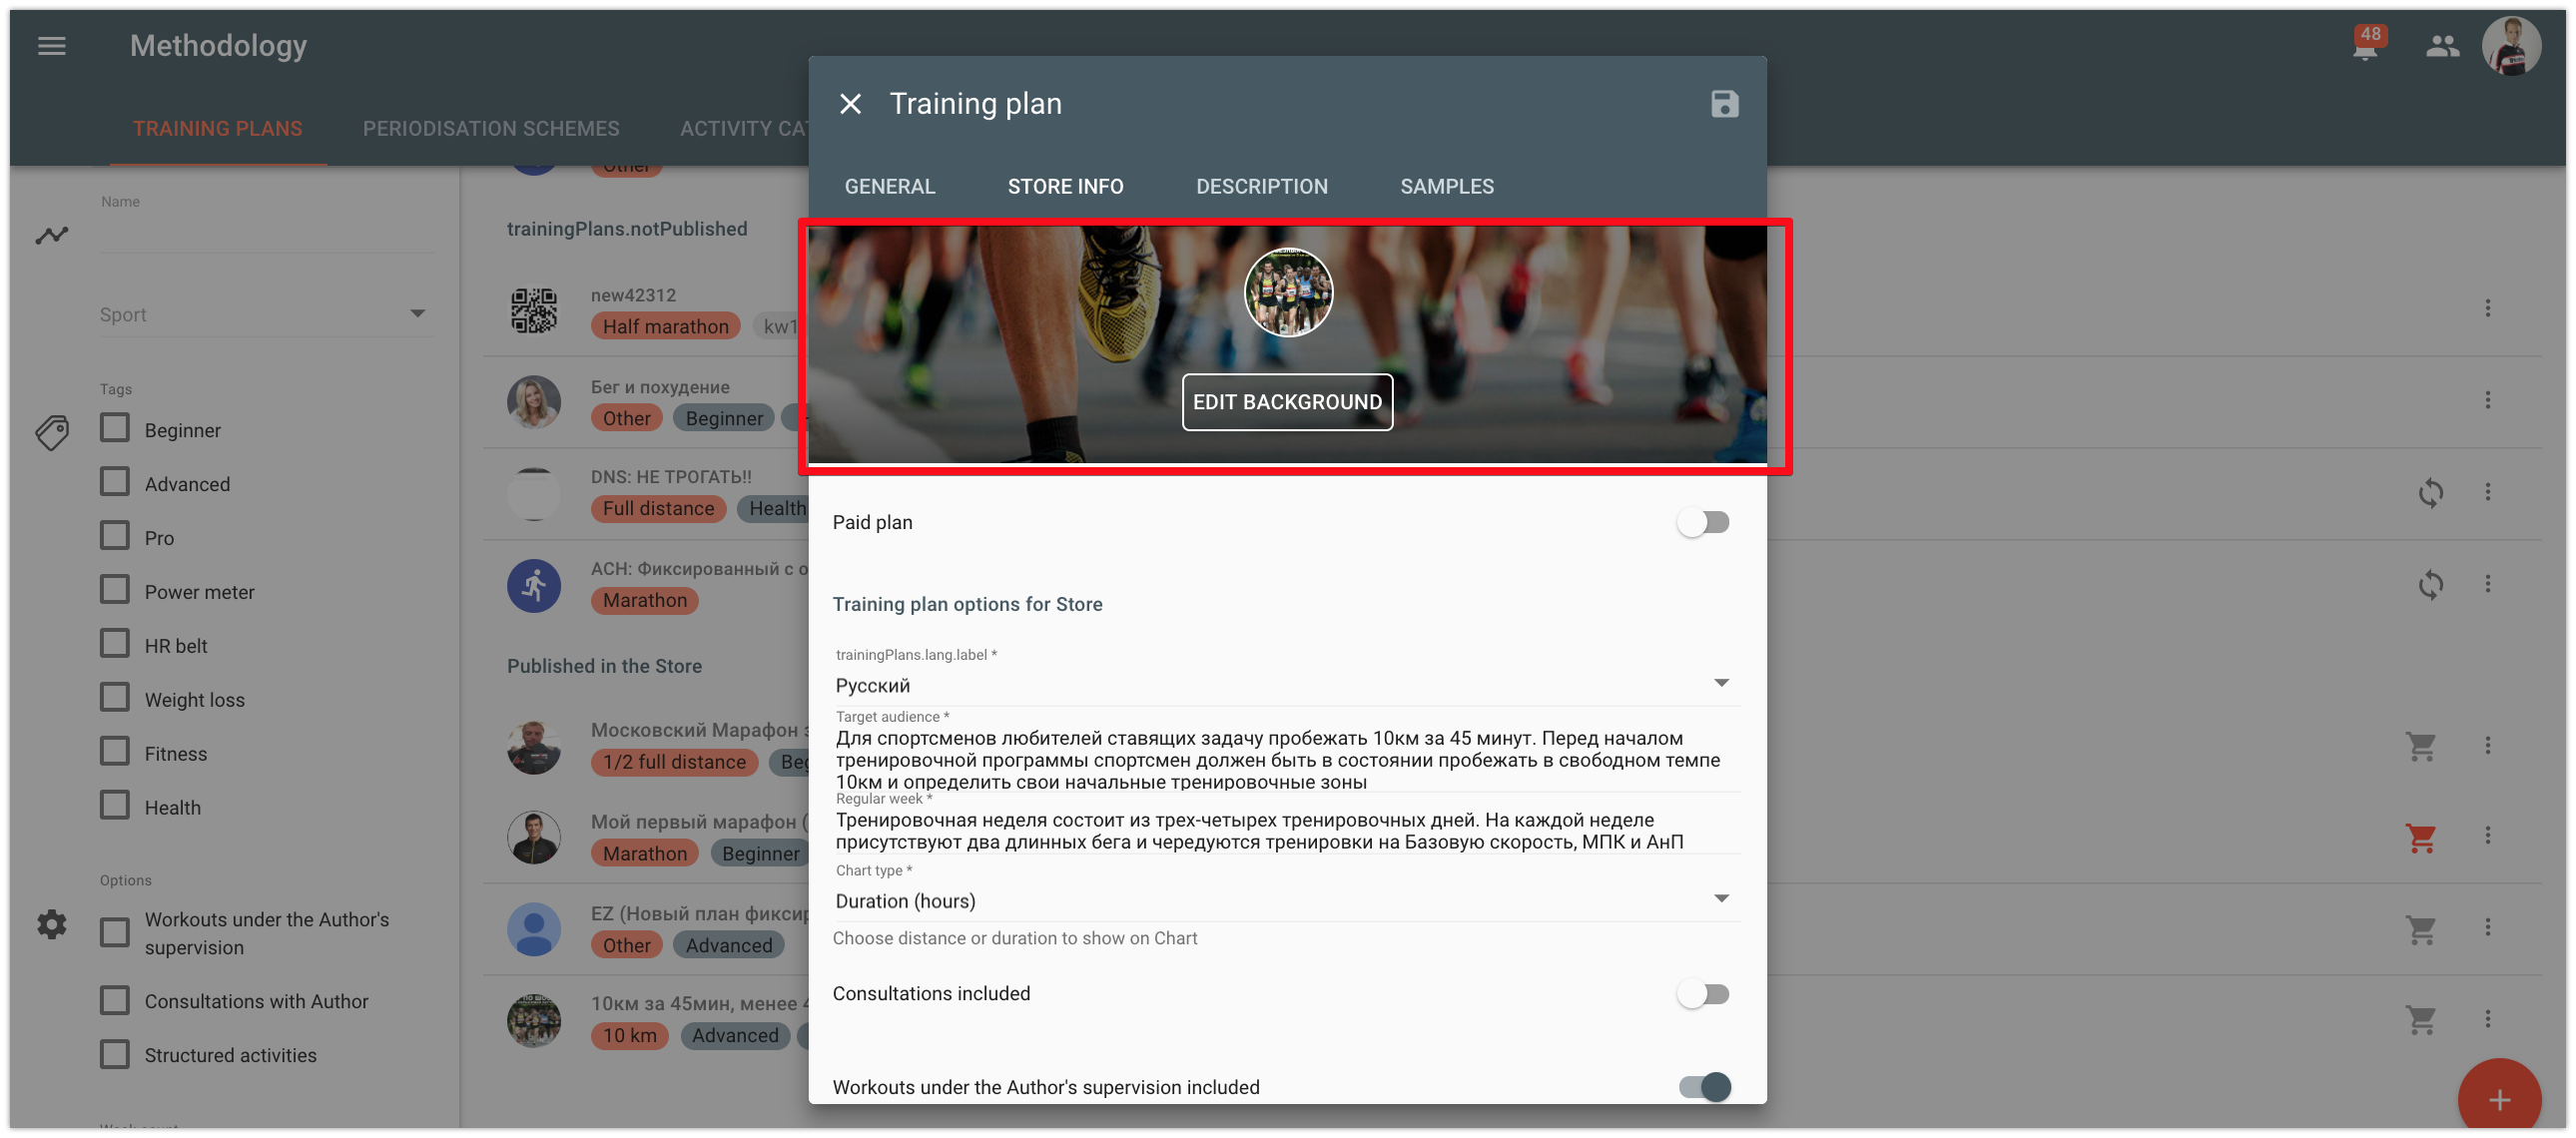
Downloaded images are used in the Store and when viewing the plan page.
Select high-quality images which you have the right to use.
Plan activities, events, competitions within the plan
In order to fill the plan, you need to go to the plan constructor. To do it, you should select “Create plan items” in the context menu of the plan.
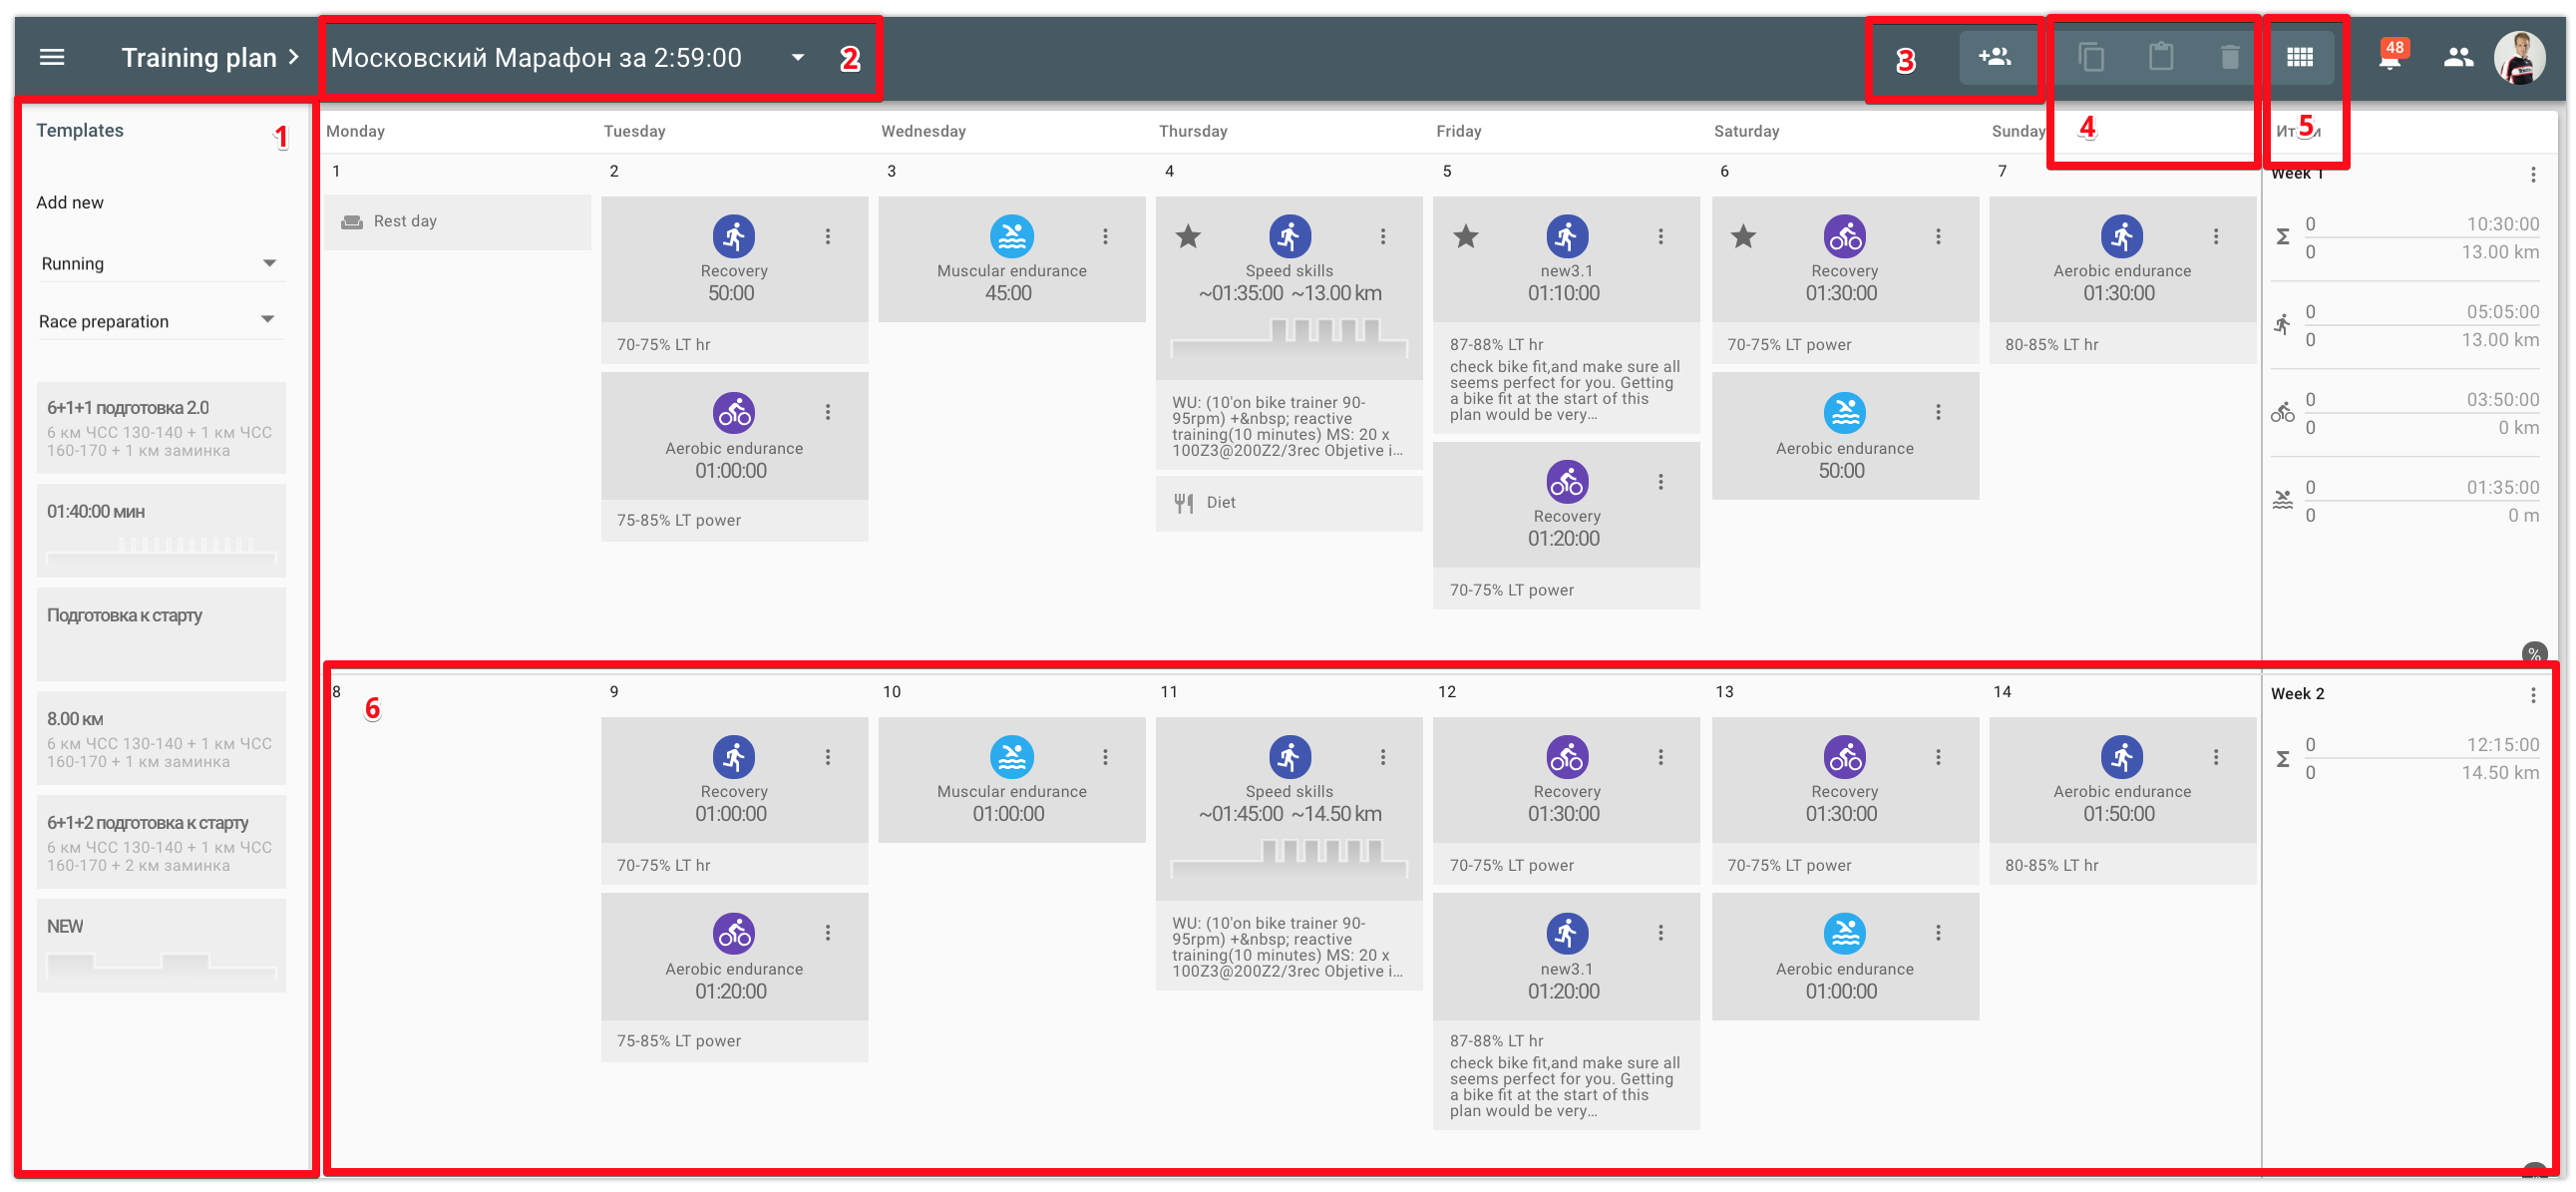
In the plan constructor window you will find:
- 1 - templates panel just like in the calendar. Templates panel is available only for users with “Coach” and “Premium” tariffs enabled.
- 2 - plan name and plan selector. When clicking on the plan name, the plan card will open where you can edit its parameters, and by clicking on the drop-down list icon, you can quickly go to the constructor of the required plan, and also return to the plans list.
- 3 - assignments. You need to click here to access the dialog box enabling to assign the plan.
- 4 - operations with activities: copy, paste and delete activities
- 5 - select the mode of displaying records in the plan: in detail/briefly;
- 6 - training week of the plan.
The process of activities, events and competitions creation within the plan is similar to the process of their creation in the athlete’s calendar.
Activities within the plan can be created:
- manually;
- from templates, by selecting template when filling in information in activity;
- from templates, by dragging and dropping template from the templates panel located to the left;
- By copying from another activity within the plan.
Please note!
In the training plan activities, intensity is always set in % of LT. It enables to use the same plan for several athletes with different fitness and LT level.
Assign plan to athletes
A training plan can be assigned to your athletes and all plan items will appear in their training calendars.
There are several ways to assign a plan.
In the context menu for the plan line select "Assignments":
OR in the plan constructor click on the "Assign" icon [3].
In the plan assignment window you need to set: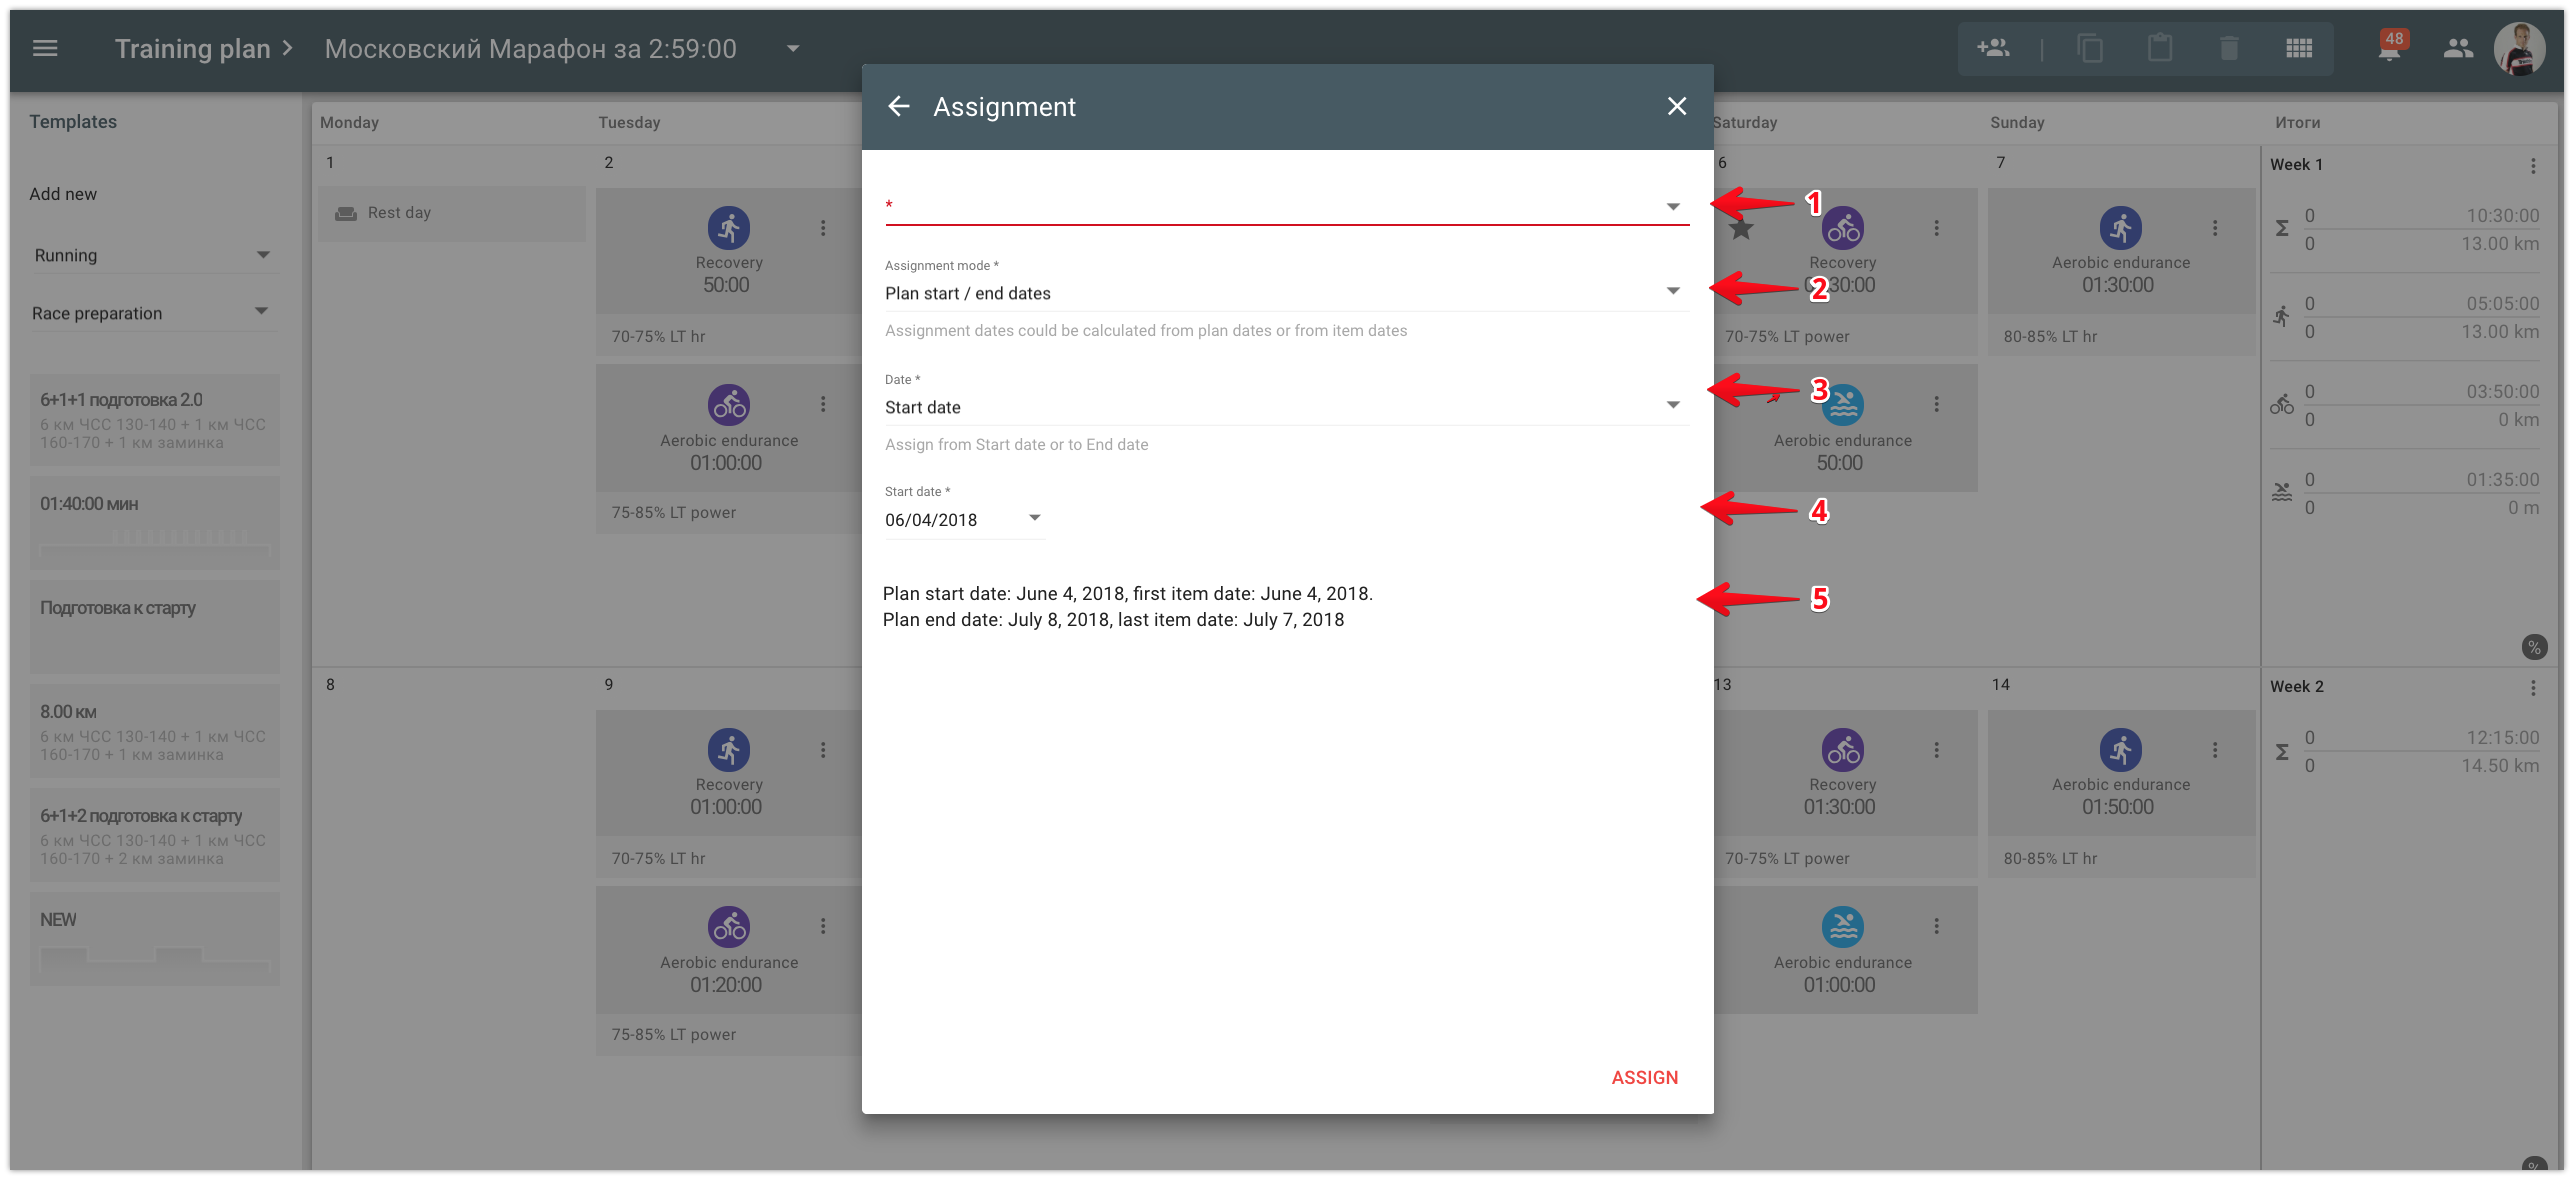
- 1 - An athlete or athletes, in whose calendars plan items should appear,
- 2 - Assignment mode, which determines the method of assignment dates calculation. You can select assignment in the plan dates or in the item (events, activities, competitions) dates. A block with dates calculation [5] in the assignments card will help you to choose the mode you need.
- 3 - Start date and end date of assignment. Date selection will help you to apply the plan either starting from a specific date or till a specific date.
- 4 - Set a date:
| Date | Description |
|---|---|
| Plan start date | The first day of the week starting from which the plan items will appear in the athlete's calendar |
| First item date | Date of the first plan item displayed in the athlete's calendar. It differs from the plan start date if the first activity is planned not on the first day of the week |
| Last item date | Date of the last plan item displayed in the athlete's calendar. It differs from the plan end date if the last activity is planned not on the last day of the week |
| Plan end date | The last day of the week in the athlete's calendar when the training plan will end |
5 - block with dates calculation, to help you check the correctness of the assignment dates.
For a dynamic plan, you can also set the "Transfer plan changes" attribute if it is required to transfer plan changes to the assigned athletes.
Important features of the plan assignment:
- Activities from the plan cannot be created on the past dates in athlete's calendars. If you set such dates so that all plan activities or part of them are assigned on the past dates, then they won't appear in the athlete's calendar.
- Dynamic plan with changes transfer can be assigned only on the plan dates. If you set different assignment dates, then plan changes won't be transferred to athletes.
- Changes made in activities which have happened in the past are not transferred to athletes. In case if in a dynamic plan assigned with changes transfer you make changes in the activity happened yesterday, then such changes won't be transferred to athletes.
Remove assignment
In the assignments window you can always track to whom and when the plan has been assigned:
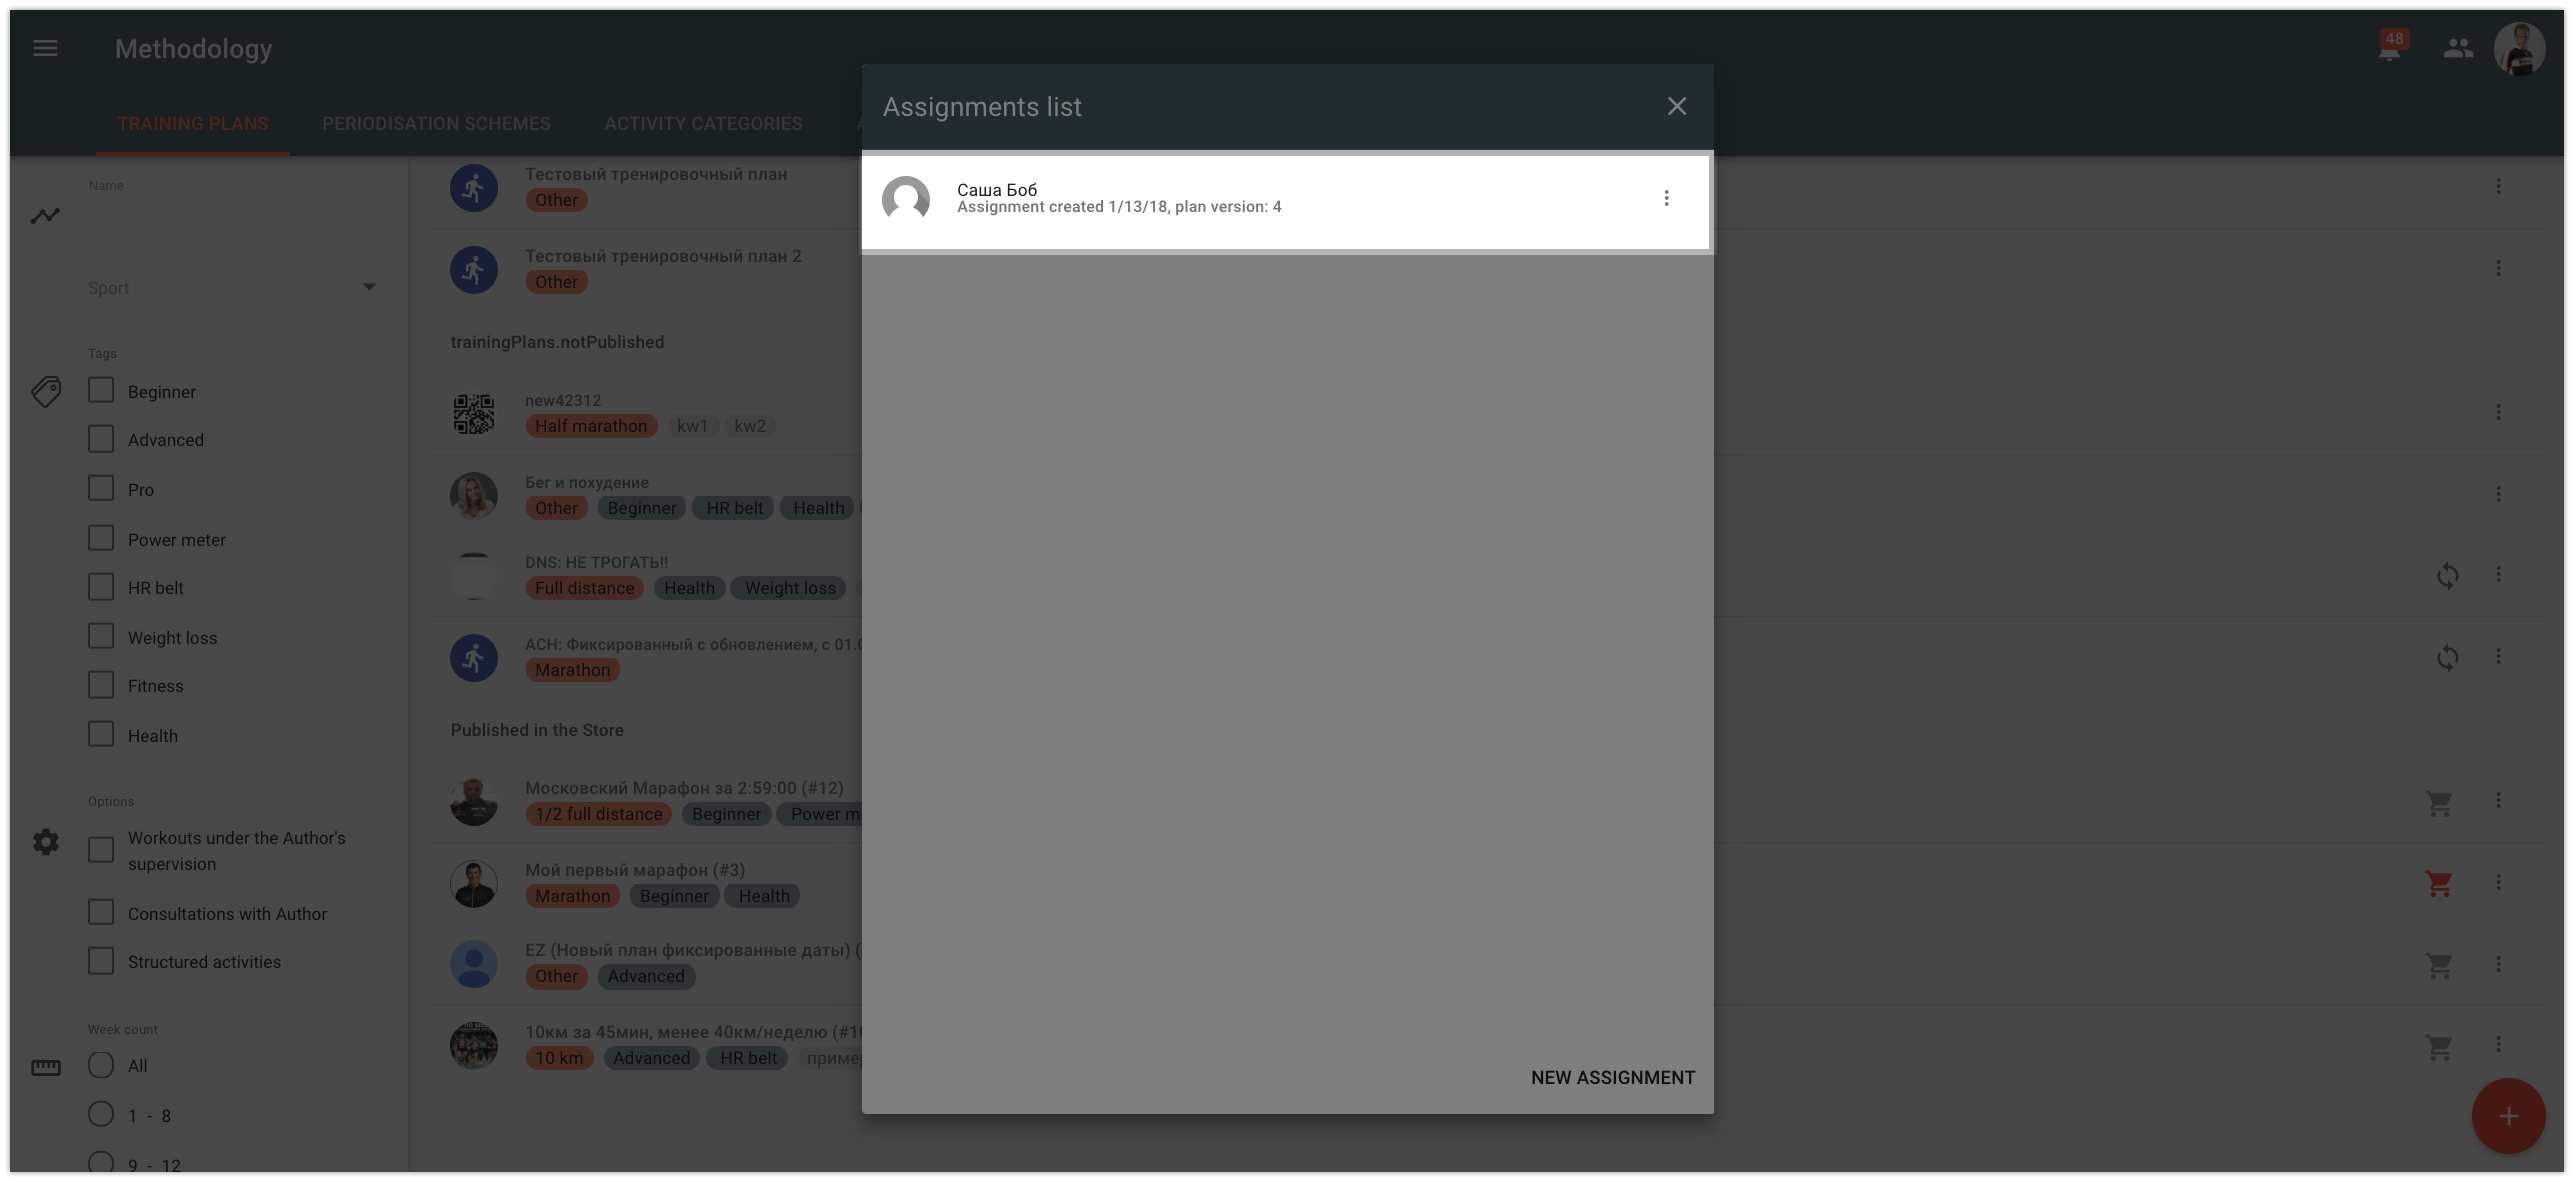
To remove assignment you need to go to the assignments context window and select the "Remove assignment" option.
After that, all uncompleted activities within the plan will be removed from the athlete's calendar.
Publish plan in the Store
In order to publish a plan in the Store:
1 - Check how your plan looks like when viewed by potential customers. To do it you need to select "Store preview (current version)" in the context menu of the plan:
Carefully check the validity of the information presented and if necessary edit attributes specified during the plan creation.
2 - Go to the plan publication dialog box. In order to do it you need to select "Publication" item in the context menu.
3 - Make sure that all checks are completed in the plan publication window.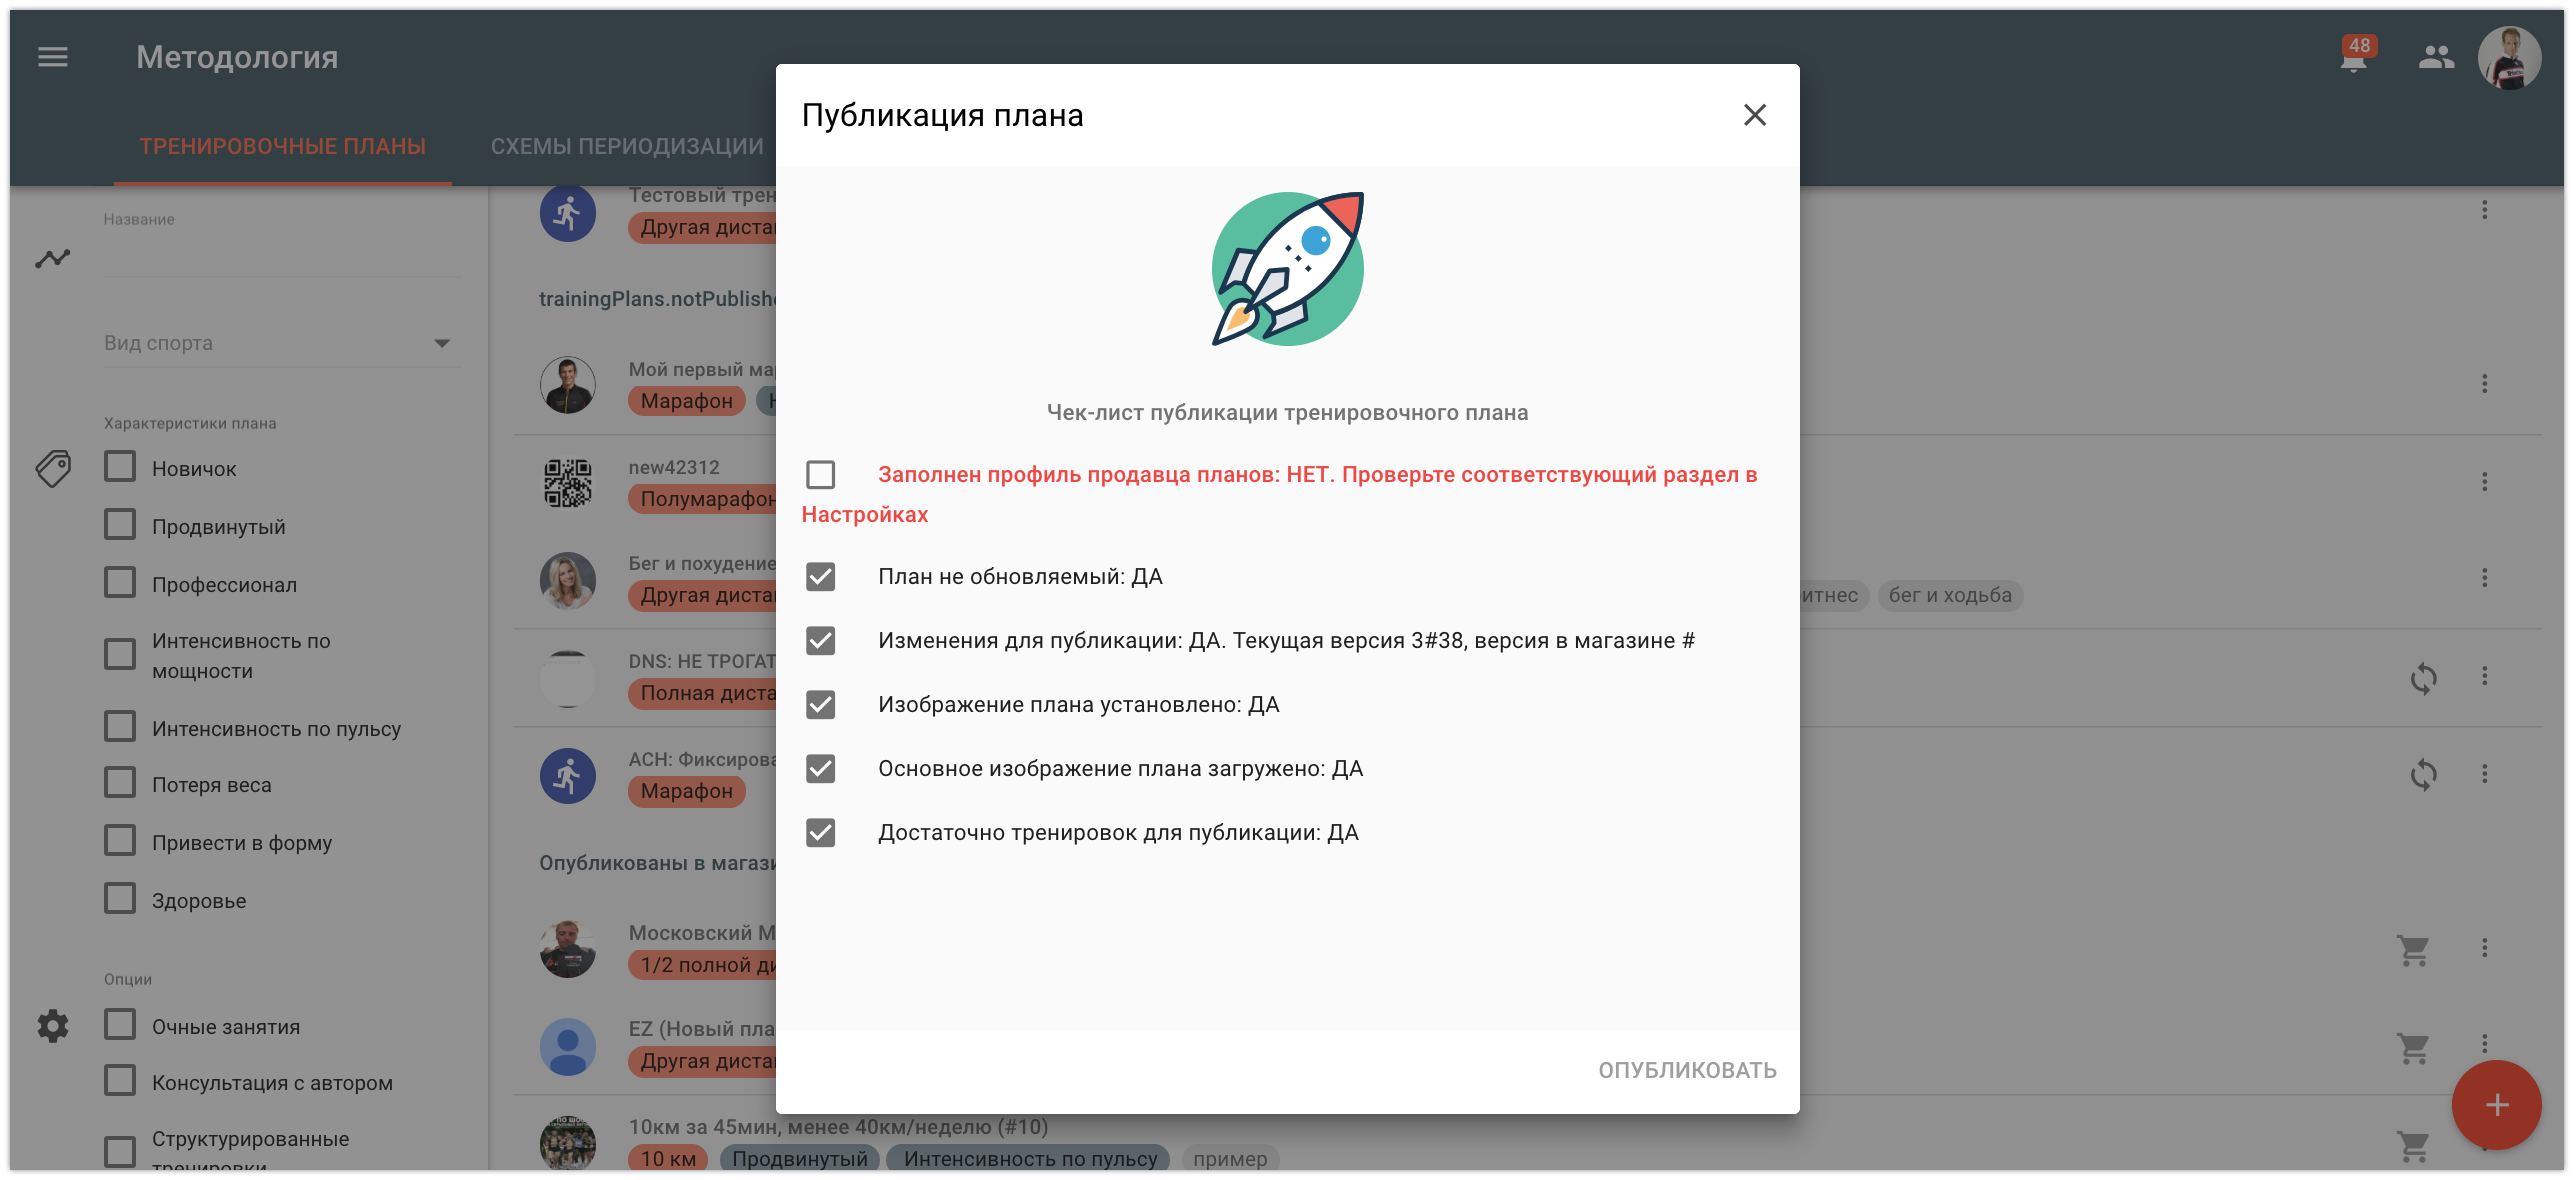
If not all checks are completed, you won't be able to publish the plan. Solve comments by changing plan attributes or user settings (if the plan Author profile is not completed).
4 - Click on "Publish" and confirm plan publication.
Publish plan updates in the Store
Any changes made after the plan publication ARE NOT AUTOMATICALLY PUBLISHED in the Store.
In order for the latest plan version to appear in the Store, you need to publish changes.
A red icon of the Store in the list of published plans will show you that the plan has unpublished changes.
![]()
To publish changes you need to click on the icon or proceed to the publication window from the plan's context menu. Make sure that all checks are completed in the publication window and click on "Publish".
Unpublish plan
You can unpublish and remove plan from the store at any moment.
In order to unpublish plan, you need to open the publication window and click on the "Unpublish" button.
This button is available for all published plans.